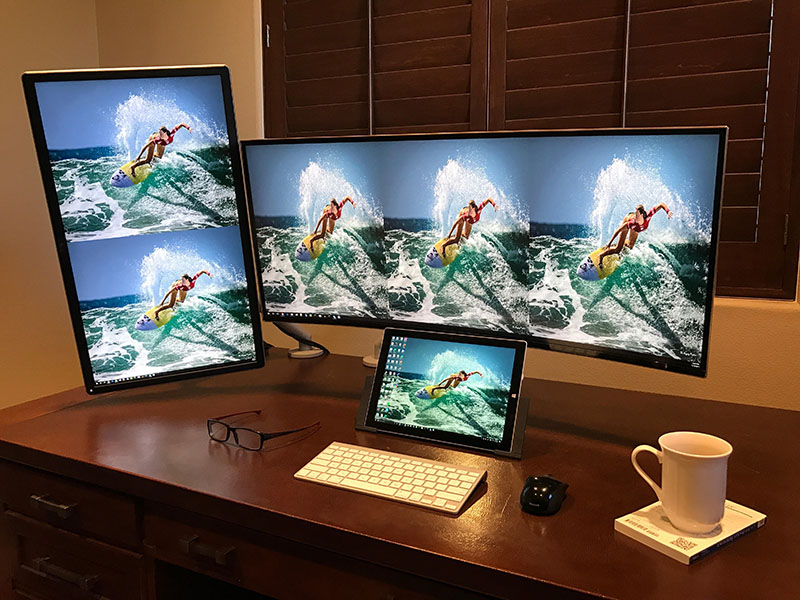
To load Virtual Display Manager (VDM), there are a few options available. It can be launched manually by executing the application, or it can be set to start automatically from the startup folder. The advantage of the latter approach is that any user-specific settings are stored within the user’s profile, eliminating the need for user-specific configuration files.
After the installation is complete, the VDM Configuration Screen is loaded. This is the central location where Virtual Displays can be defined and enabled. If VDM is not configured, there will be no changes to monitor partitioning into Virtual Displays. However, window scaling related to changes in the desktop size will still be activated.
For convenient access to VDM configuration features, a System Tray icon is loaded along with VDM. Right-clicking on this icon provides access to various VDM features, allowing for easy customization and adjustment. On the other hand, double-clicking the icon loads the VDM Navigation applet, which simplifies the movement of selected windows to and from desired Virtual Displays with just a click of a button. Alternatively, windows can be manually moved and maximized to the desired Virtual Displays, as if they are being controlled by the geometry of a physical monitor.
In summary, VDM can be launched manually or set to start automatically, and the configuration screen allows users to define and enable Virtual Displays. The System Tray icon provides quick access to VDM features, while the VDM Navigation applet streamlines the movement of windows between Virtual Displays.
Maximizing a window while pressing the [Alt] Key results in a window maximized across the adjacent Physical Monitor.
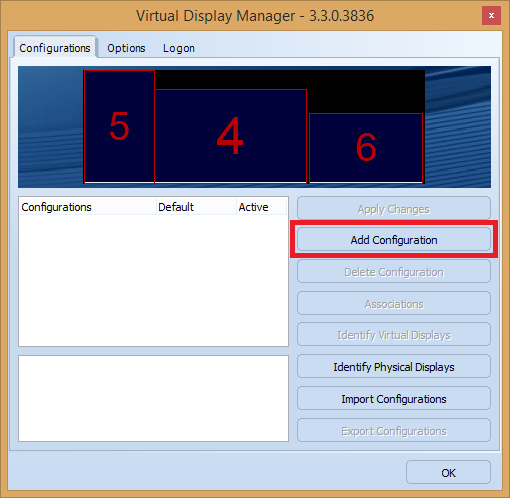
VDM Configuration Screen
In the basic configuration of Virtual Display Manager (VDM), the VDM configuration screen is displayed, showing the user’s current desktop. At the top of the window, a scaled-down overview of the physical monitor configurations is shown, depending on the number of physical monitors connected to the system. It’s important to note that VDM does not control the relative position, size, on/off states, color depth, or refresh frequency of the physical monitors. These settings are typically managed through a standard Windows applet for monitor configuration, which is usually available for local environments only.
The physical monitor numbering is also controlled by Windows and may not necessarily start with “1” or be continuous. To identify each individual monitor, VDM provides an “Identify Monitors” button that produces familiar Windows numeric identifiers centered at each monitor.
To preserve or export the desired configuration, there are two options available: “Save” and “Save As” buttons. Clicking the “Save” button will save the current configuration and set it as the default. On the other hand, the “Save As” button allows the configuration to be saved under a desired name, enabling multiple configurations to be created. These configurations can then be easily accessed by the user with a single click from the VDM icon in the System Tray.
If the current VDM installation does not have any configurations to import, the “Add Configuration” button should be pressed, which loads the “Add Configuration” screen. This screen provides options and settings to create and customize new configurations.
Overall, the basic configuration of VDM involves loading the configuration screen, displaying the current desktop, allowing users to manage physical monitor configurations through standard Windows applets, providing options to save configurations as default or with custom names, and allowing the creation of new configurations through the “Add Configuration” screen.
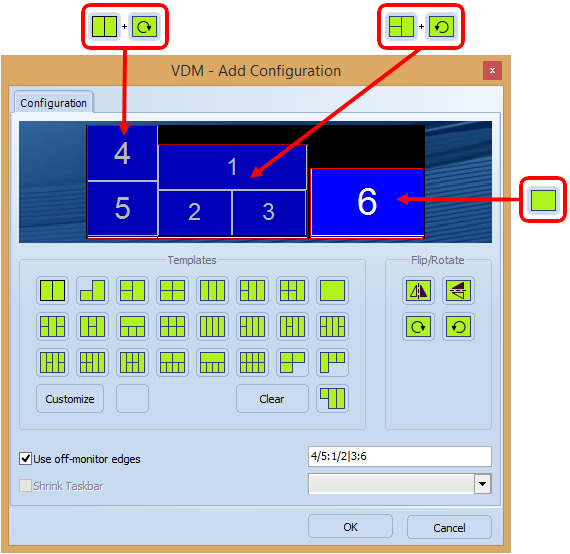
Add Configuration Screen. A few template manipulation steps are outlined.
To simplify the configuration process in Virtual Display Manager (VDM), prebuilt templates are provided. These templates offer predefined configurations that can be applied to selected physical monitors, providing a real-time preview of how the future configuration will look. Users can choose a desired template and then make further adjustments using Flip/Rotate transformations. Additionally, the size of the virtual displays can be fine-tuned through the “Customize” button.
In situations where monitors are not split by VDM, it is important to assign the “BLANK” configuration to the unconfigured physical monitor. Failure to do so will prevent maximized windows from being displayed on the unconfigured monitor.
When using VDM to control virtual displays, enabling them is straightforward. Within the basic screen of VDM, users can select any of the provided templates for configuration. Each physical monitor can be independently configured using a template or custom configuration. The flexibility of VDM is further enhanced by the ability to apply Flip or Rotate transformations to individual monitor configurations. Additionally, if needed, the horizontal Taskbar can be adjusted to fit the virtual display. However, please note that this option is disabled in Windows 8. For cases where custom sizing for virtual displays is required, the “Customize” button opens up additional configuration options.
Overall, VDM offers prebuilt templates for simplified configuration, allowing users to choose and adjust configurations with real-time previews. Assigning the “BLANK” configuration to unconfigured monitors is important to ensure maximized windows can be displayed on them. The basic screen of VDM provides options to enable virtual displays, apply templates or custom configurations, and make further adjustments such as Flip/Rotate transformations. The “Customize” button offers additional configuration options, including custom sizing for virtual displays.
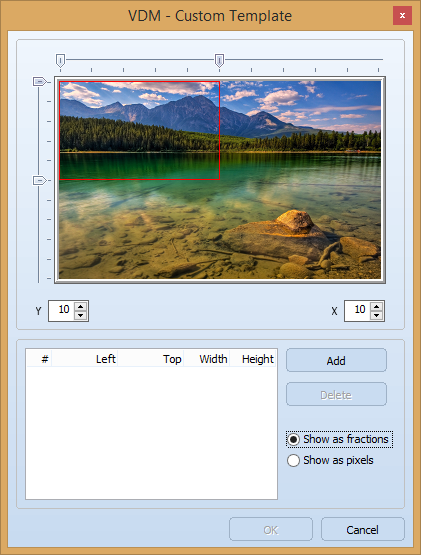
Custom Template Screen
As an example, let’s consider a three-monitor configuration that has been split into six virtual displays using standard templates in VDM. While the naming convention for configurations can be based on user preferences, more complex configurations may require a different approach. For instance, a configuration name like “4/5:1/2|3:6” can be used as a guideline for consistently labeling complex configurations. In this example, the “/” character is used to separate monitors that are stacked vertically, and the pipe character “|” is used to separate monitor IDs that are positioned horizontally next to each other. The “:” character is used to indicate the physical monitor separation.
Once the desired configuration is set, it can be immediately applied by clicking the “Apply Changes” button. It is also advisable to set the “Default” checkbox to ensure that the desired default configuration is always loaded when VDM starts up.
In summary, this example illustrates a three-monitor configuration split into six virtual displays using standard templates. The naming convention for configurations can be adapted based on user preferences or complexity. Applying the configuration changes promptly and setting the default configuration ensure a seamless experience with VDM.
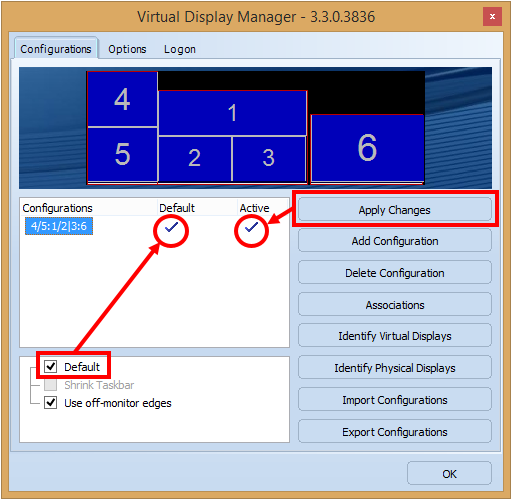
Example of VDM configuration – default and active states are set
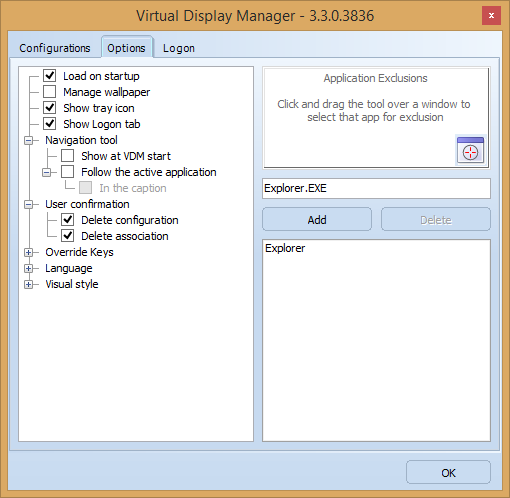
Configuration Options Tab.
Within the configuration options of Virtual Display Manager (VDM), you have control over various settings:
-
VDM load on startup: You can choose whether VDM should start automatically when the system boots up.
-
Wallpaper configuration: VDM allows you to manage the wallpaper settings to match the virtual displays, ensuring a consistent visual experience.
-
System Tray icon: You can choose whether the VDM icon should be displayed in the System Tray or not. By default, it is shown.
-
Logon Tab option: The Logon Tab option in the VDM configuration screen can be shown or hidden based on your preference.
VDM also provides a Navigation Tool that simplifies the process of repositioning maximized windows to the desired virtual display.
Additionally, there is an option to use an override key that, when pressed while maximizing a window, disables VDM’s window positioning. The override key can be configured, with the default being the [Alt] key.
You can set the desired language and visual style for the VDM configuration interface.
Furthermore, VDM allows you to exclude specific applications from its management. This can be done by specifying the executable name of the application. You can enter the name manually or use the built-in finder tool to detect the EXE for a selected window.
The Advanced Configuration Screen in VDM includes two additional sections: the “Virtual Displays” section and the “Customize Individual Virtual Displays” section. These sections provide more in-depth options for configuring virtual displays and customizing individual virtual display settings.
In summary, VDM offers configuration options related to startup behavior, wallpaper management, system tray icon display, Logon Tab visibility, language and visual style selection, application exclusions, and advanced settings for virtual displays and their customization.
Virtual Display Manager (VDM) offers the capability to configure the logon screen alignment, particularly in scenarios where the user desktop is locked, and only the logon screen is visible. This feature allows you to shrink the login screen to align with a specific desired area on the physical monitor.
This configuration becomes particularly useful in situations where remote sessions are utilized. By aligning the remote session’s login screen with the local physical monitor, you can ensure a seamless transition and alignment between the two environments. This can enhance the user experience and make it easier to manage and navigate between local and remote sessions.
In summary, VDM provides the option to configure the alignment of the logon screen, allowing you to shrink it and align it with a specific area on the physical monitor. This is especially beneficial for remote sessions, ensuring a smooth transition and alignment between the remote session’s login screen and the local physical monitor.
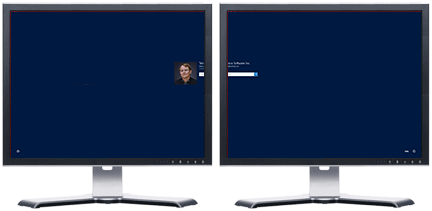
VDM with no changes to logon screen. While desktop spans two monitors, logon screen is split between to physical screens and is hard to use.
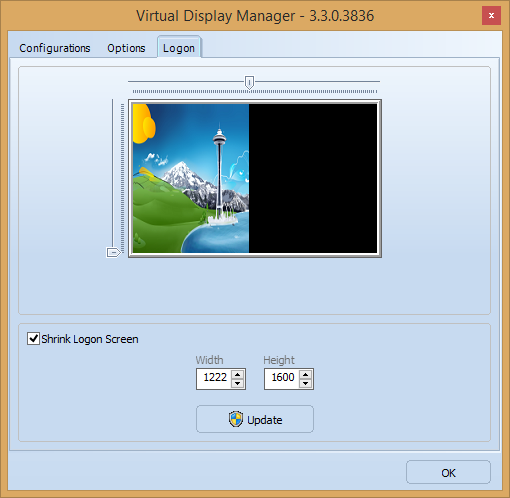
VDM Configuration logon option.
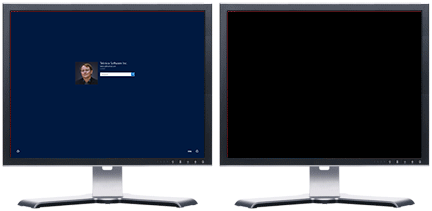
VDM logon option is applied. Now logon is properly centered on one of the monitors. Current VDM implementation supports saving multiple configurations within User profile. One of the saved configurations can be set as default to be loaded on the next VDM launch.
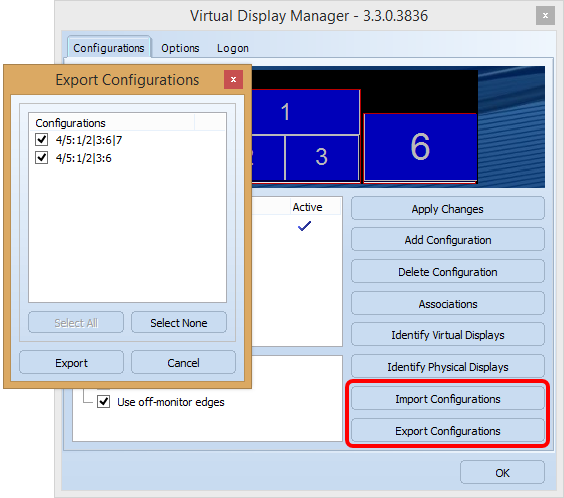
Single or multiple configurations can be exported to allow import by another user. VDM import files are in *.VDC format.”
